Types of Reports
Report Writer offers two types of reports:
Canned reports
These reports are pre-calculated with all fields and display options defined for the user. Within the fields, users can define additional criteria (i.e., requesting information about a particular school or date range). These reports provide fewer configuration options and allow a ready-made report for common data requests.
Transactional reports
While some transactional reports have a default setup of fields to display in a particular order, transactional reports can be entirely configured. Users can change the fields display, define additional criteria for each of those fields (i.e., display only records within a certain postal code) and change the order in which records appear. In addition, users can create transactional reports completely on their own with no-predefined fields or setup.
Working with Canned Reports
All of our canned reports can be found on the left menu under the Reports tab in the School module. These reports can be identified with this icon:
These reports have pre-defined fields, although some have filters allowing you to further narrow which data is displayed. For instance, for some reports that examine grades, you may be able to select a particular grade for which you want to view information.
1. In the School module, select on Reports tab.

2. You have two sections of reports: "My Reports" and "All Reports". My Reports are going to contain all your reports that you have saved. All Reports will contain all the reports we have available.
To begin creating the report, click and expand the folder and then click the name of the report.
3. Using the provided fields, select any further defining criteria for each field. If your report has different filters, please note that only information for records that match the selected criteria will appear.
4. When you have all the criteria selected, click Generate.
5. If you need to export the report for your needs, you have options of printing it, exporting it as PDF or Excel spread sheet.
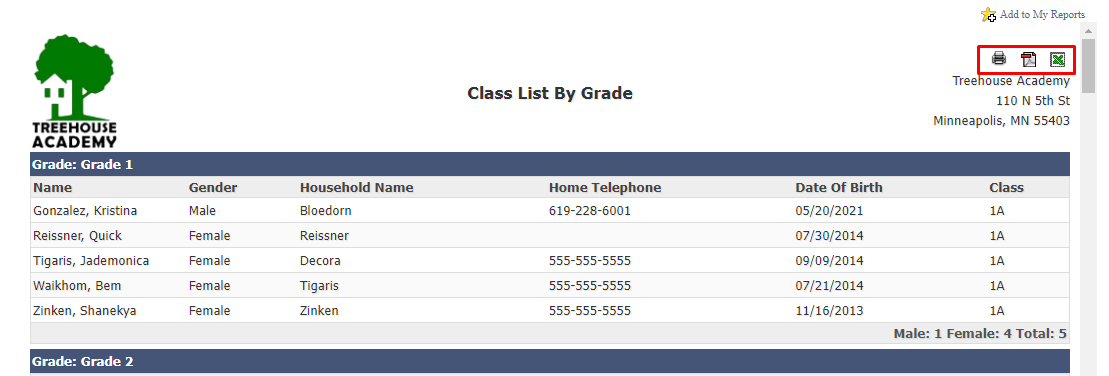
6. If you want to save the report so that you can run it again in the future or for quick access, you can click on "Add to My Reports" and it will add it to your My Reports on the left.

Working with Transactional Reports
Transactional reports can be found in "All Reports" or you can build your own. In the list of reports, transactional reports can be identified with this icon:
Creating transactional reports can be a simple or detailed task, depending on the complexity of the report you want to create. Before building your report, you should begin to consider each of the elements you will need to work with to create the report.
Data Set: Each report must belong to a data set, which is a category of fields. This will help with organization and will determine the type of information contained within the report. Selecting a data set will determine what fields are available for use in the report.
Columns: Within a category, you can select pieces of information to be included in each column of the report. These pieces of information are based on the fields filled out within Educate. Each piece of information that should be included in the report or used as a criterion should be selected as a column.
Display: Once you have columns, you can change the label, order or format of each of the columns. This can help you to organize the report and make sure that each piece of information is labeled in the most meaningful possible way for your organization or the recipients of the report.
Grouping: If the records should be clustered according to a certain type of information (i.e., all students by grade), you will need to set up the grouping rule. You have the option to group multiple items (i.e., within each grade level, you can sort by last name) for further organization. Each group can be sorted in ascending or descending order.
Sorting: If the records should be sorted alphabetically or numerically, should choose to sort the records based on the results in each column. When used with grouping, you can only sort fields that have not been grouped. If grouping is also used, sorting will be applied after grouping rules. In this case, after all grouping has been performed and each group has been sorted according to the criteria, the records within each group will be sorted according to the sorting criteria
Criteria and Filtering: Both criteria and filtering options are included in the Criteria tab. Criteria will allow you to determine limits on the data that will be displayed every time this report is generated. For example, in a report pulling student demographic information, you could use the criteria to pull data for a specific year.
Filters allow you to specify a new value for a criterion each time the report is run. For example, you could use the filters to specify the dates that the report examines, so that each time the report is ran, users can specify which dates they want to look at.
Criteria and filters are important for narrowing the number of results displayed. If your organization has hundreds of thousands of records in the system, this is very important to limit the length of the report and prevent the system from timing out when trying to retrieve many records.
Creating the transactional report
1. In the School module, select on Reports tab.
2. In the middle of the page, you will see a collection of data sets available to use for your report. Click on the name of the report you need.
3. It will bring you to a page of tabs. This is where you will begin to build your report.
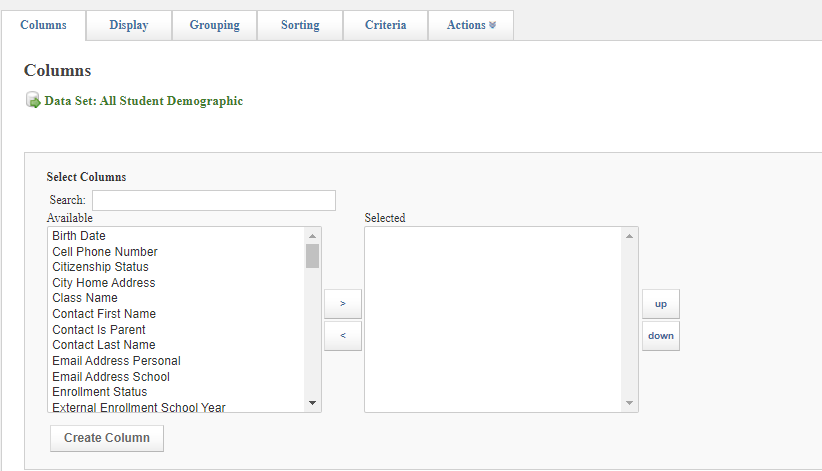
A. Columns: Each column represents a piece of information that will be displayed on the report
From the Available scroll box, select the fields to be displayed on the report. Once selected, click on the right arrow (>) to move it over to the Selected scroll box. Once you have your fields in your selected box, you can utilize the UP and DOWN buttons to change the order in which it will appear in the report. When finished, click continue.
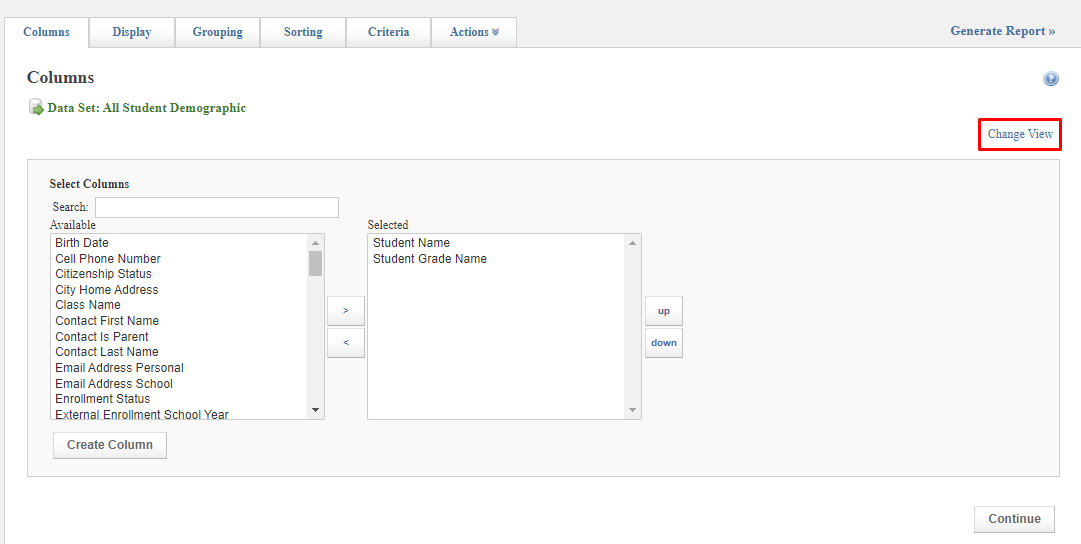
(Optional) If desired, you can change the column view, so the fields are displayed in a different list of fields, sorted by the type of field:

B. Display: The next tab that you will be brought to is Display. If you would like to change the order of the fields or the labels, alignment or format of the information, you will need to set up display options.
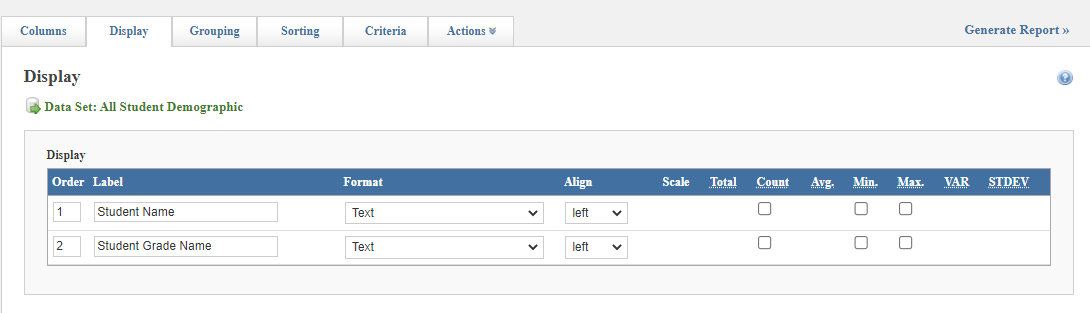
- To change the order of the fields, type the numbers corresponding to the order in which the fields should appear in the Order text box. Please note that you only need to change the number of the fields you want moved; all other fields will be updated automatically.
- To change the label that will appear for this information on the report, in the Label text boxes, enter in the text you want.
- To change the way that the data will display (if possible), under the Format dropdown menu, select the desired format. Please note that some fields will only offer one type of display.
- To change the alignment of the information within its column on the report, from the Align dropdown menu and select the desired alignment.
- If you are working with numerical values and want to view a related calculation (i.e.: a total, average or minimum value for the record), select the checkbox for the appropriate calculation. Please note that this option is only available for columns that have numeric values.
- When all changes are made, click Continue
C. Grouping: The next tab is Grouping. If you would like to place all your records within similar values in a specific column together (i.e.: all students by grade level), you will want to utilize grouping rules.
- From the list of available fields, select the field and move it over to the Selected scroll box. The list of available fields to select from will vary based on what was select from the Columns tab. Should you need more, go back to the Column tab, select the field and move it into the Select box and then return to this step.
- You are more than welcome to select more than one field into the selected box. Please utilize the UP and DOWN buttons to sort the grouping order. The field at the top will be the primary grouping rule. Each field following will be grouped within the first field. For example, if we select Grade level and Class name as the two grouping rule, the report will sort the data by grade level first and within the grade levels, the classes will be grouped together.
- To select whether the groups will be listed in ascending (i.e.: 1-10 or A-Z) order or descending (i.e.: 10-1 or Z-A) order, select the group and then select the Asc or Desc buttons.
- When satisfied, click on Continue.

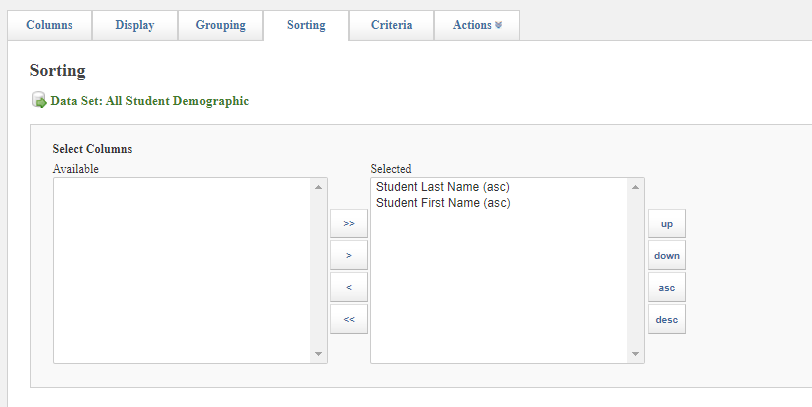
D. Sorting: The next tab is Sorting. If you would like to place records in a particular order (i.e.: A-Z, 10-1) by the values in a certain column, you may do so using the sorting rule. When combined with grouping, sorting will be performed after all data is grouped. In this case, after being placed in each assigned groups, data in those groups will be sorted according to the rules set here.
- From the list of available fields, select the field you want to sort by and move it over to the Selected scroll box. You will notice that the options will depend on the fields selected in the Columns tab and what has been selected in the Groupings tab. If the field has been selected in the grouping tab, it will no longer be available as a sorting option.
- You are more than welcome to select more than one field into the selected box. Please utilize the UP and DOWN buttons to sort the grouping order. The field at the top will be the primary sorting rule. Each field following will be sorted within the first field. For example, if we select Student Last Name as our first selection and then Student First Name, the report will sort the data by student last name first and then by first name. In this case, your results could look like all students with last names Anderson first and then by first name.
- To select whether the groups will be listed in ascending (i.e.: 1-10 or A-Z) order or descending (i.e.: 10-1 or Z-A) order, select the group and then select the Asc or Desc buttons.
- When satisfied, click on Continue
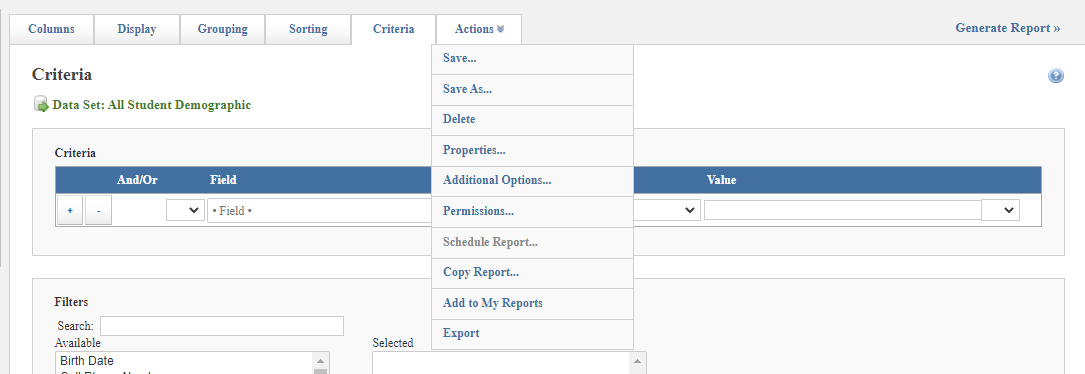
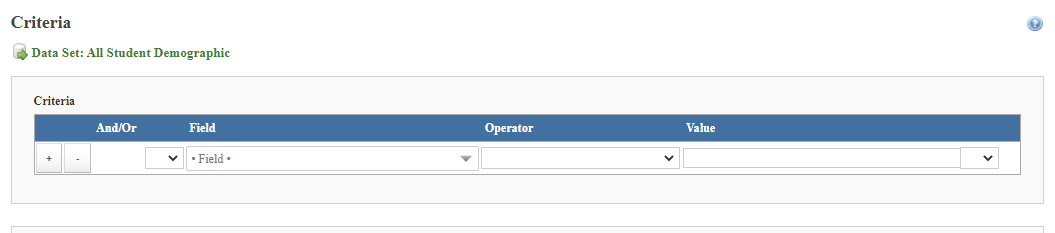
E. Criteria: The next tab is Criteria. This tab allows you to determine limits on the data that will be displayed every time this report is generated. For example, in a report that displayed only active students, criteria would be used to dictate that only records where the Student Active field was equal to Yes should be included
Filters allow you to specify a new value for a criterion each time the report is generated. For example, you would use filters to specify a date range, so that each time the report is generated, users can select a date range of assignments
Criteria and filters are important for narrowing the number of results displayed. If your organization has hundreds of thousands of records in the system, this is very important to limit the length of the report and prevent the system from timing out when trying to retrieve a large number of records.
- From the Field dropdown menu, select the column for which you are restricting the values.
- From the Operator dropdown menu, select the way in which the field value must relate to the value you are specifying (i.e.: if the value should be equal to the one you are about to specify, should not blank, or should contain the value)
- From the Value field, type or select the value for the criteria
- OPTIONAL: To group criteria together, use the parentheses in the second drop down menu and the last dropdown menu. Please make sure that there are no parentheses left open when you continue. If there are open parentheses, the report will generate an error and your criteria selections will be lost.
- To add a new criterion, click Add. A new row will appear. To relate the new criteria to a previous criterion, from the first dropdown menu, select whether both criteria must be met (And) or only one of them (Or). Please note that if both And and Or are used within one set of criteria, you will need to use the parentheses in the second dropdown menu to group together
- To add a filter (i.e.: a field for which values can be specified before running the report each time), from the Available scroll list in the Filters section, select the desired field(s). You can select multiple fields by pressing and holding the "Ctrl" key on your keyboard and clicking each desired option.
- Click Add
- To change the order that the filters will be displayed, select the filter to move and use the Up and Down buttons.
- When finished, click on Generate Report.
F. Actions: The next tab is Actions. After you generate your report and it has the contents you've set from the previous tabs, you can utilize this tab to set how you want to handle the report: Save, delete, set who can access the report, etc.
- To save the report for future reference, you can click on "Save As". You will be able to title the report, give it a description, select what category the report falls under (i.e.: Student, Household, Courses, etc.) You will also be able to select staff members who should have access to generate this same report. In the "Add to My Reports For:", please select your name at the minimum so that you have access to the report. Afterwards, you can then Save. Each time that the report is altered, you can click on Actions again and click save to save the changes. Please note that only users with access to the School module can access this report. If you assign this report to a teacher, they will not be able to access it because they do not typically have access to the School module.
- To delete the report, you can click on "Delete".
- To change the properties of the report, you can click on "Properties". This will allow you change the name of the report, change/update the report description, update/change the category and update the users who has access to this report.
- To change the appearance of the report, you can click on "Additional Options". You can change the color of the text, grouping orders, row, change the orientation of th report and to allow page breaks.
- To set viewing restrictions on all or part of the report, you can click on "Permissions". Use the checkboxes to select the appropriate permissions for each security group. When finished, click Save.
- To create a copy of the report, you can click on "Copy Report" and select your name and save. You can then go into the copied report found in your My Reports and you can adjust the report as needed.
- To export the report, you click on the Export option or the Export button on the generate report page. Select the type of report you need to export, and it will populate the file for you.