
Granting access students access to Educate is a great way to allow them to track their own progress through attendance, assignments, schedules, and more! The process will follow a very similar path to giving Staff or Households access to Educate, but should use a security group built specifically for students.
Granting Student access to Educate:
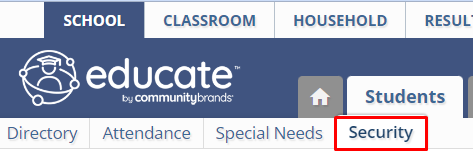
- In the School Module select the Students tab.
- Click on Security in the gutter menu.
- In the drop-down menu that says "Students with Access" change to "Students with No Access"
- Hit Go.
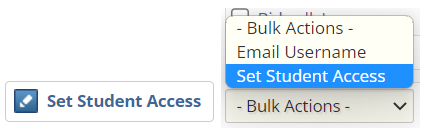
- Select users to grant access by checking the box next to their name(s).
- Click the "Set Student Access" button or within the Bulk Actions menu, select Set Student Access.
-
In the "What would you like to do?" section, select Grant Access.
-
From the Security Group drop-down menu, select the security group to which these students should be added.
*If one does not exist, please reach out to Educate Support to create a security group for you.
-
In the Notify User section, select whether a message should be sent to these users to inform them of their username and password.
-
Click Continue.
-
A confirmation dialog box appears. Click OK.
-
If you selected to notify users, the Notify User page appears.
- In the Reply To dropdown, select the email address from which this message should come.
- In the Subject text box, make any changes to the subject line of the message.
- In the Message text box, make any changes to the auto-generated message.
- When finished, click Send. Emails with login information will be sent to the users. Any users who do not have an email address on file will be listed.

Questions or Concerns?
Reach out to our Educate Support Team at educate-support@commmunitybrands.com or by phone at 888-730-3256.