Setting Up Categories for Scores-Based Grading
Categories can be used to organize assignments, weight assignment grades and/or set up extra credit assignments. Categories should be set up at the beginning of your class so that you can use them throughout the term and immediately assign your assignments to the appropriate categories.
Each assignment you add to the section should be associated with a category. If you’re using grade weighting, this ensures that all assignments receive the correct weight. When you set up weighted categories, each category will be assigned a weight that corresponds to the percentage of the final grade that will be determined by assignments in this category. If you’re not using grade weighting, this ensures that your assignments will be organized correctly in your Gradebook and (if applicable) displayed in the correct categories to parents viewing them through the Household portal.
When working with weighted categories, you can also add additional categories that are not weighted. This can be used for extra credit assignments or for items that you may want to grade for your own reference that should not be calculated into a final grade.
- Open the desired section.
- From the left menu, select the Assignments link. The Assignments page appears.
- Select the Assignment Categories tab. The Assignment Categories page appears.
-
To set up categories for weighted grading,
HINT: Your section must be set up to allow grade weighting by category, in addition to your creation of weighted categories here, for your grades to be weighted. You can check on the type of weighting enabled in the Overview page under Section Details > Weighting.
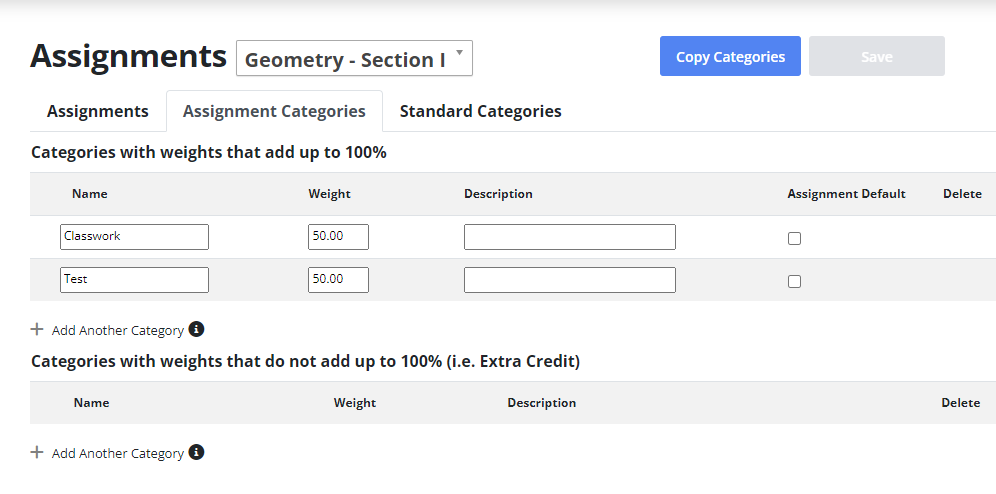
- In the Categories with weights that add up to 100% section, if necessary, click Add Another Category. A new row appears for a category.
- In the Name text box, type the name of this category. HINT: It is best for category names to be relatively short, as they will be displayed in the gradebook to sort assignments and short names can be easier to read.
- In the Weight text box, type the percentage of the final grade that assignments in this category should be given.
- OPTIONAL: In the Description text box, type any additional descriptive information about this category.
- If this section is set up to allow dropping grades, in the No. of Low Scores to Drop column, type the number of low scores that can be dropped from this category.
- Repeat steps a–e until all desired weighted categories are set up. NOTE: In order for grade weighting to work correctly, the sum of all the weights must be equal to 100.
- To set up additional unweighted categories. If your section does not weight grades by category, you should set up all your categories in this section.
- In the Categories with weights that do not add up to 100% section, if necessary, click Add Another Category. A new row appears for a category.
- In the Name text box, type the name for this category. HINT: It is best for category names to be relatively short, as they will be displayed in the gradebook to sort assignments and short names can be easier to read.
- OPTIONAL: In the Weight text box, type the maximum percentage of the final grade that should be affected by assignments in this category. HINT: This option is only visible if your section weights grades by category. NOTE: If no assignments in this category are entered for a student or if a student receives zeros for assignments in this category, it will not count against the student.
- OPTIONAL: In the Description text box, type any additional descriptive information about this category.
- If this section is set up to allow dropping grades, in the No. of Low Scores to Drop column, type the number of low scores that can be dropped from this category.
- Repeat steps a–e until all desired categories are set up.
When finished, click Save. The assignment categories are set up and ready to apply to assignments.
Setting Up Assignments
You can create assignments in each section you are associated with in Educate Classroom. Once you have created an assignment, it will appear in your gradebook and, depending on the settings you choose, may be visible to parents and students using Educate Household to view their assignments and grades.
- In Educate Classroom, click on Instruction tab on side menu. Then the Overview tab where appears for the first section in the list of sections you are associated with. NOTE: Sections will be listed alphabetically; the first section may not be your first class of the day.
- From the drop down menu, select the section you want to create an assignment for.
- From the left menu, select the Assignments link. A list of any assignments that have already been created for this section appears.
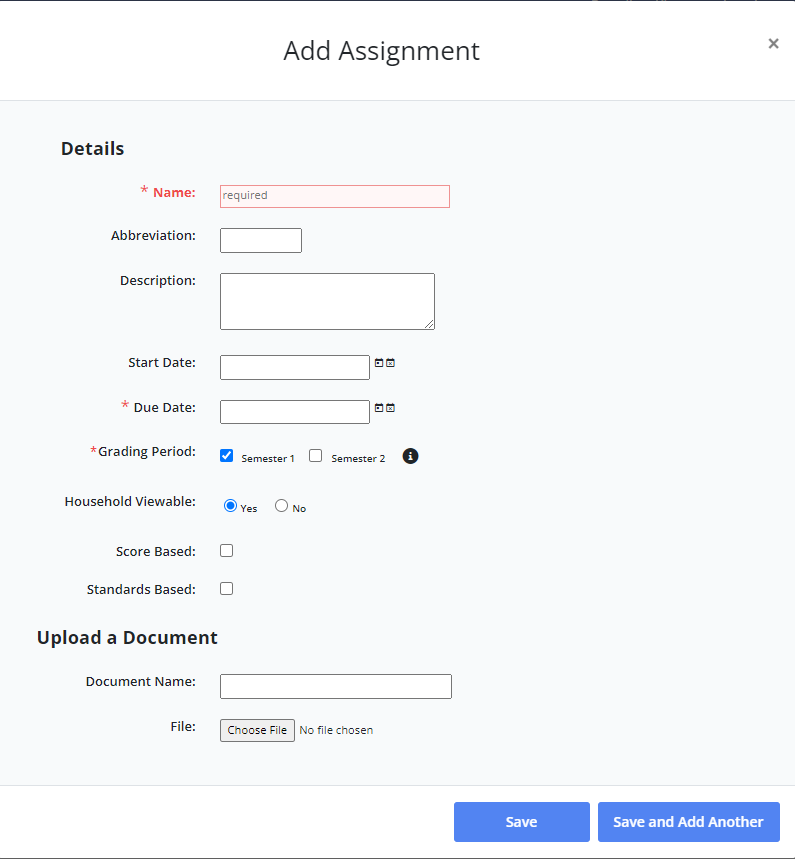
- Click the Add an Assignment button. The Details page appears.
- In the Name text box, type a title for the assignment.
- In the Abbreviation text box, type any shorter version of the name to appear as needed.
- In the Start Date text box, type the date when this assignment will be available for students. OR Click the Calendar icon to select a date from a calendar. OR To enter the current date, click the Today link.
- In the Due Date text box, type the date this assignment will be due. OR Click the Calendar icon to select a date from a calendar. OR To enter the current date, click the Today link.
- If necessary, in the Type of Gradebook section, select Scores.
- In the Points Possible text box, type the maximum number of points possible on this assignment. HINT: If extra credit is available, do not include the possible extra credit points in this text box, Type instead the number of points that should be reached to have a score equal to 100%.
- If your section is set up with assignment categories, from the Category drop down menu, select the desired category. HINT: Assignment categories will control grade weighting, if your section weights grades.
- In the Description text box, enter assignment details. HINT: To check the spelling of your description, click the Check Spelling icon .
- In the Grading Period section, select the grading period(s) for the assignment. HINT: The assignment’s grade will be included in calculating final grades for all selected grading periods.
- If this assignment should be viewable for members of students’ households logging in to Educate, in the Household Viewable section, select Yes.
- If your section is set up to automatically drop the lowest score, if this assignment can be one of those scores that could be dropped, select the Can Be Dropped checkbox.
- When finished, click Save. The assignment is added and the Details page is displayed for the assignment.

Entering Grades in the Gradebook
- In Educate Classroom, click on Instruction tab on side menu. Then the Overview tab where appears for the first section in the list of sections you are associated with.
- Select the desired section using the drop down menu.
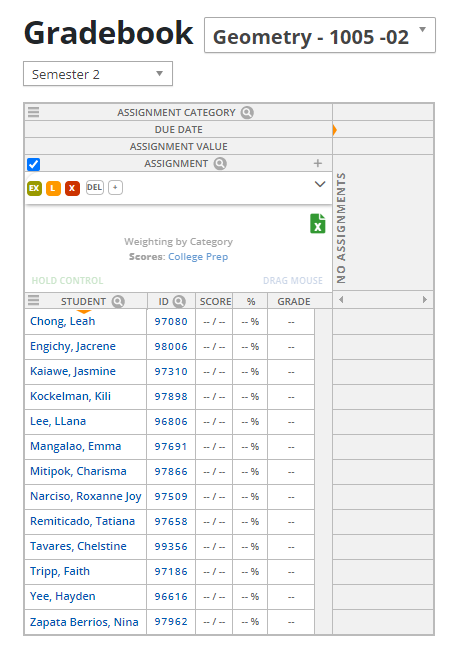
- From the left menu, click the Gradebook link. The Gradebook page appears.
- If necessary, ensure that the Scores tab is selected.
- If necessary, from the Grading Period drop down menu, select the grading period (e.g., Quarter 1, Trimester 2) for which you are entering grades.
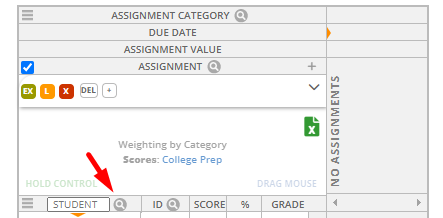
- OPTIONAL: To locate a student,
- In the first column, in the row directly above the student names, click the Search icon. The cell becomes a text box.
- Type the name or part of the name of the desired student. Student names matching your criteria appear as you type. HINT: This will hide all students whose names do not match your typing. To view all students again, click Clear.
- Click on the student you wish to add an assignment score for.
- Enter the student's score and/or gradebook code into the provided text box.
- To move to the next student for this assignment, press Enter. OR To move to the next assignment for this student, press Tab.
- When finished, from the bottom of the page, click Save. The grade is saved in the gradebook.